I've been reading for years about the joys of making your own gear. While not creative by nature, I have always thought about ways to improve gear. I may never create something entirely new, but will now be able to customize my own gear at least. The first step to entering the world of MYOG is to decide on a project/projects. This calls for something simple. My first items will be hammocks, followed by stuff sacks, tarps, custom sleeping bags/quilts, and of course, clothing repair.
With this in mind, I needed to research tools for the job. I scoured the web looking for the sewing machine of choice. From all of the MYOG forums I came to several conclusions. The first is that I won't be calling it a sewing machine. It'll be my "Electro-mechanical Thread Injector". Sounds manly enough for a backpacker to operate, eh? The second thing is that the machine would be simple enough to learn on, while still having all metal moving parts(pre-1970). As Singer was the brand of choice for my own mother, it would be mine as well. After watching Craigslist for weeks, all I found were collectibles. The Singer Featherlights were the coolest looking machine of this nature, but all cost way too much. So, I stumbled upon a Singer Slant-O-Matic 500A "Rocketeer". How much more manly can you get than a Thread Injector known as "The Rocketeer"? Shoot, it was even originally marketed as "the best (sewing) machine ever made". I purchased it for $75, and it arrived within days.
 |
| Singer 500A "Rocketeer" |
The next thing I did was looked for materials for my projects. My source was
Rockywoods.com. They had everything on my list. I ordered 8 yards of 1.9 oz. Silnylon(for 2 hammocks), 8 yards of hook & loop(Velcro), 8 yards of bug mesh, some thread, some stretchy lycra/nylon for gaiters, and a zipper for customizing a sleeping bag. Shockingly, it was $135 worth of materials. They shipped them out the next day, and they arrived even before the "Rocketeer".
After making these purchases, it was time to learn to operate the new tool. So, like any newbie who is nervous of asking about these kinds of things, I went straight to Youtube. There, I found hours and hours of instructional videos. Some even using my machine! I felt like I was going to be able to do this now. Besides, there is no turning back once the toys are bought! Last stop at Hobby Lobby for scissors, pins, and some cotton material to practice with. The old lady who helped me didn't even laugh at me at all. Maybe more men make their own gear than I originally suspected.
There's a great website that shows how to make hammocks, with step by step instructions(and even pictures).
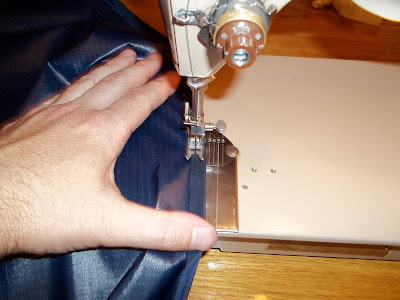
Jeff's Hiking Page is my favorite one-stop source for all things hammock. I would be following his instructions for my project. The only difference is that I would eventually plan on adding bug screen. Here's some pics of my progression. Note that the rolled hem on the outsides is to prevent the hammock from tearing. It's not supposed to be PERFECT!
 |
| Sewing a Rolled Hem without proper Presser Foot. |
 |
| Hem failed to Roll on first attempt. |
 |
| It's easier to sew an 9.5' X 5' piece of Silnylon when rolled like this. |
 |
| A tightly whipped end. |
 |
| Finished! Lacks suspension for now. |
And there it is folks, minus the bug screens. I need to decide how I want them to work. Which means actually sleeping in the hammocks first. My suspicion is that I will want modularity, so may use the hook & loop fastener to make them removable. I ordered the "tree hugger" straps from JacksRbetter.com. Once they arrive, we will test both of my new hammocks.
The second project I tackled was to repair a split butt seam on my REI Sahara Convertible Pants. They are great pants (used only in the woods), but still, I kinda want my butt INSIDE the pants. So, I looked at them a bit, decided what to do, and did it. It turned out kind of ugly. I got some extra material pinched into my seam. It took an hour to carefully remove the seam. On the second try, I got it nearly right. The only problem is I was still using black thread. It sticks out like a sore thumb. And guess what? It doesn't bother me at all. I'll wear those pants like a badge of honor. I had a dream of repairing them, and I fulfilled that dream! Here's the pics:
 |
| Busted seam, outside view. |
 |
| Busted seam, inside view. |
 |
| Viewed from outside of pants. |
 |
| Viewed from inside of pants. |
P.S. If anyone has any small(ish) stickers they want to donate to "The Rocketeer", you can email me. JakeWillits@trailsavvy.net


Great! Now you have me excited to make my own gear too. Sounds like a bit of effort, but worth it in the end. I think I might add a section to my own blog, JosephTravels.com, and reference back to you. Thanks for the post!
ReplyDeleteThanks Joseph. I only wish I wasn't a compulsive planner. It seems like I have to spend weeks planning something to play with, then in an evening, it's done. I like your blog as well.
ReplyDeleteThanks Jake! I can identify with that, more than I would like to admit :). If you want, please visit my new JosephTravels page and "like" it: http://www.facebook.com/pages/JosephTravels/212677718774208
ReplyDelete